INTRODUKSJON
Denne programvaren er ment for å betjene Colifast ALARM-instrumentet med tilhørende komponenter. Metodefiler kan lastes inn for å kjøre ulike oppsett, og du kan lage filer for å utføre spesifikke oppgaver ved å bruke komponentene på en tilpasset måte.

GETTING STARTED
1. Selecting bottle size
-
Navigate to the Bottle Size menu and set the size of the medium bottle (typically 21 samples per bottle).
-
This value is directly responsible for stopping the instrument when there is no medium left.
-
The medium progress bar will display the amount of medium remaining.
-
Ensure this value is correct, as the instrument will not allow a run to start if the remaining medium is set to zero.
-
Clicking the medium progress bar allows the user to register the installation of a new bottle.

Note: You can order a bottle size that suits your frequency of medium bottle change. Most customers use a 21-day bottle for a 3-week change frequency. Volumes for 14 samples are also readily available. Ensure this setting is aligned with the bottle volume.

2. Selecting method
-
Navigate to the method selection
-
From the Method File drop-down menu, select the file you want the program to run.
-
Select the target bacteria group from the Analysis drop-down.
-
This option controls the incubation time of the method only, and adjustments to this parameter, must coincide with adjustments of temperature and type of medium too.
-
Give us a call to discuss your options.
-
-
Set the frequency of samples:
-
continuously
-
24 hours intervals
-
48 hours intervals
-
Custom interval (in days)
-
-
Additional options
3. History
-
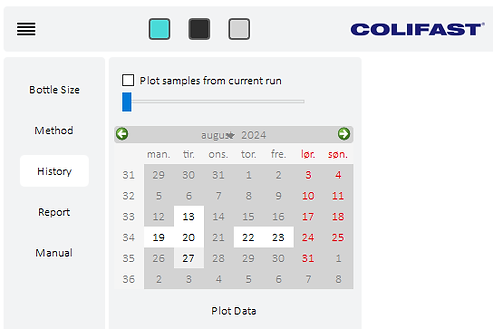
In the History menu, you can plot historical data based on the plot
-
How to use the function:
-
Click on the date you wish to plot. Dates with sample data are highlighted in white.
-
If multiple samples are available for a given date, the program will prompt you to select the starting time of the sample you want to plot.
-
You can plot several samples sequentially. Use the slider to select days or check the plot samples from current run option to display all samples from that specific run (based on the bottle size setting).
-

4. Report

-
In the Reports menu, you can generate reports
-
Click the create report button to generate a report.
-
The report will be saved in the C:\Colifast\Reports folder on your local machine.
-
The reports are sorted further in folders by year, month, and then the filename contains the date.
-
ADVANCED MENU
Note: We do not recommend operators to access this menu.
-
The Advanced menu allows the components to be handled manually.
-
This is a feature for doing service on the equipment.
-
The access is password protected, and that is simply to avoid messing with important sample runs. Some of the components are not set up to handle multithreading, and trying to access them whilest a method is running might halt the program.
1. ADU
-
This page allows the user to manually turn on/off the relays of the ADU208 relay unit.
-
There is an ADU Load button for initializing and updating the ports of the ADU.
-
There is a Reset button for turning all the relays off.
-
A Status field shows the status of the ADU (connected or not).
-
The Test button runs read and write calls to all the ports of the device
-

2. Spectrometer
This page allow the user to load available spectrometers, and run some service tasks related to the spectrometer
To calibrate:
-
Open a dialogue that allow you to read the turbidity.
-
This must be done using bottles containing the right turbidity solutions (0, 5, or 10 NTU).
-
After the value is read the user can choose to Save New Value to settings, and thereby updating the calibration value.


Spectrometer operation:
-
Readings to average over is a value that tells the equipment how many readings the spectrometer shall take before it calculates the average and returns the value, default 3 readings.
-
Integration Time is the time used by the spectrometer to scan a single reading in milliseconds, defualt is set to 500 ms (0.5 s).
Florescence
-
The nanometer wavelength at which the spectrometer reads fluorescence, default is set to 430 nm.
-
The threshold, which is the point at which a sample is interpreted as a positive bacteria alarm - default is 1.5 times the intensity value of the initial baseline measurment.
-
The UV-LED button allows the user to turn on/off the UV-LED whilest in the spectrometer interface, this simplifyes the testing of the LED when used in conjunction with the Spectrometer Liveview functionality.
Turbidity
-
The nanometer wavelength at which the spectrometer reads the turbidity, default is set to 860 nm.
-
The threshold is the value for which a turbidity alarm is set. The value is 4 NTU, which is calculated based on 0, 5, and 10 NTU turbidity calibration solutions.
-
The IR-LED button allows the user to turn on/off the Infrared-LED whilest in the spectrometer interface, this simplifyes the testing of the LED when used in conjunction with the Spectrometer Liveview functionality.
Spectrograph
- The Spectrometer Liveview button is starting a live plotting of the input to the spectrophotometer, with the wavelength on the x-axis and intensity on the y-axis.
LIQUID HANDELING
Note: This is not integrated with computational threading and should thus not be used during a sample run.
This page allow the user to manualy control the pumps and liquid ports of the system
1. Syringe Pump
-
Initialize the pump at the chosen Syringe COM port.
-
Send a Custom command to the syringe pump using the text field, then press the button.
-
Click on the valve head to change port, the tooltip shows which port it will change to upon clicking, which is then the oposite of the current port.
-
The Empty button will make the plunger of the syringe pump go to the very top of the pump, therby emptying it.
-
The Fill button will draw the plunger of the syringe to the lower most position therby filling it completely (25 ml).
-
The up-arrow will allow you to dispense the volume set in Syringe Volume (μl) at the set Flowrate (μl/s).
-
The down-arrow will allow you to aspirate the volume set in Syringe Volume (μl) at the set Flowrate (μl/s).

COM ports are external connections to computers, that once connected, works almost as integrel parts of the computer. The are therefor often very stable once set up, but if there is some error to the connection they will not propperly reset before the system has undergone a rebooting. That is why we often recommend a reboot when the system has trouble connecting to the syringe pump.
2. Multiposition Valve
3. Peristaltic Pump
The Peristaltic pump picture is also a button that turns on/off the peristaltic pump.
-
Initialize the valve shifter at the chosen MPV COM port.
-
The Syringe pump is connected to the senter of the MPV, and the senter is then linked to one of the 6 channels of the valve.
-
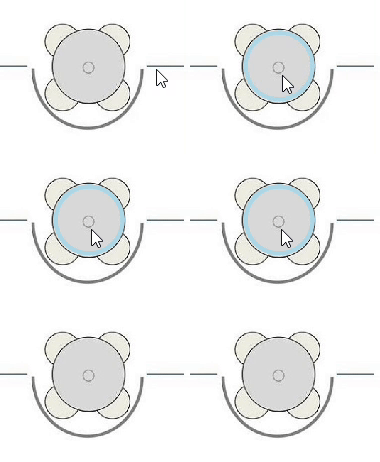
Choose a valve and CLICK on it to shift to its position, the tooltip will display what the channel is.
Default positions are as follows:

TIPS
1. STOPPING
The Stop Button will abort the program imediately, only stalling if a component are midway through an operation. But if you wish to stop the run after the current sample has ended, right click the button and select stop run after current sample has ended.
Thank you for using the Colifast ALARM Instrument!